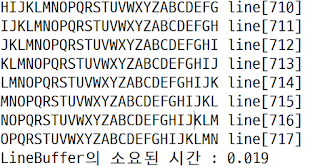
1) 1바이트씩 출력하기
2) 한 줄씩 출력하기
위의 2가지경우가 있는데, 예제를 통해서 살펴보자
FileInputStream은 파일의 내용을 읽어오는데, 1바이트씩 문자를 읽어온다.
이와 다르게 BufferedReader는 파일(텍스트)을 한 줄씩(한 라인씩) 읽어서 값들을 출력 할 수 있다.
예제. 1바이트씩 출력한것과 한 줄(텍스트의 한 라인)씩 출력 소요시간 비교
- package org.java.project;
- import java.io.BufferedInputStream;
- import java.io.BufferedReader;
- import java.io.FileInputStream;
- import java.io.FileNotFoundException;
- import java.io.IOException;
- import java.io.InputStreamReader;
- @FunctionalInterface
- interface ByteCodePrint{
- public void ByteCodeFunc();
- }
- abstract class ByteCodes{
- public static String FileReadPath = "data.txt";
- }
- class ByteCodeExam extends ByteCodes {
- public BufferedReader br;
- public long startTime;
- public long endTime;
- public FileInputStream fis;
- public ByteCodeExam() throws FileNotFoundException{
- super();
- this.fis = new FileInputStream(ByteCodes.FileReadPath);
- this.br = new BufferedReader(new InputStreamReader(this.fis));
- }
- public void fileClose() {
- if(this.fis != null)
- try {
- this.fis.close();
- if(this.br != null)
- this.br.close();
- } catch (IOException e) {
- // TODO Auto-generated catch block
- e.printStackTrace();
- }
- }
- ByteCodePrint LinePrint = () -> {
- String reader = "";
- try{
- this.startTime = System.currentTimeMillis();
- while((reader = this.br.readLine()) != null) {
- System.out.println(reader);
- }
- this.endTime = System.currentTimeMillis();
- System.out.println("LineBuffer의 소요된 시간 : " + (this.endTime - this.startTime) / 1000.0);
- } catch (IOException e) {
- System.out.println(e.getMessage());
- }
- };
- ByteCodePrint OneBytePrint = () -> {
- try {
- int reader = 0;
- this.startTime = System.currentTimeMillis();
- while( (reader = this.fis.read()) > 0) {
- System.out.print((char) reader);
- }
- this.endTime = System.currentTimeMillis();
- System.out.println("\nOneByte의 소요된 시간 : " + (this.endTime - this.startTime) / 1000.0);
- } catch( IOException e) {
- System.out.println(e.getMessage());
- }
- };
- }
- public class Compile{
- public static void main(String[] args) {
- try {
- ByteCodeExam b = new ByteCodeExam();
- b.OneBytePrint.ByteCodeFunc(); // FileInputStream의 객체로 1Byte씩 출력하기
- b.LinePrint.ByteCodeFunc(); // BufferReader의 객체로 한 줄씩 출력하기
- b.fileClose();
- } catch (FileNotFoundException e) {
- System.out.println(e.getMessage());
- }
- }
- }
실행결과
1) 1Byte씩 출력
2) 한 줄씩 출력

위의 소스코드는 한줄에 A~Z까지 차례대로 번갈아가면서 출력을하는데,
총 717줄까지 존재하며, 717줄까지 출력하는데 걸리는시간을 비교한 예제이다.
Buffer라는 메모리에 한 줄의 문자들을 전부 담아서 한줄씩 출력하는데 걸리는 시간이 더 짧았으며 이는 우리가 파일이나 네트워크상에서 입/출력 스트림을 처리할때에는 buffer를 사용한다면 더 효과적인 방법일것이라는 것을 설명하는 예제이다.
다음시간에는 DataInputStream에 대해서 살펴보도록하겠다.


댓글 없음:
댓글 쓰기